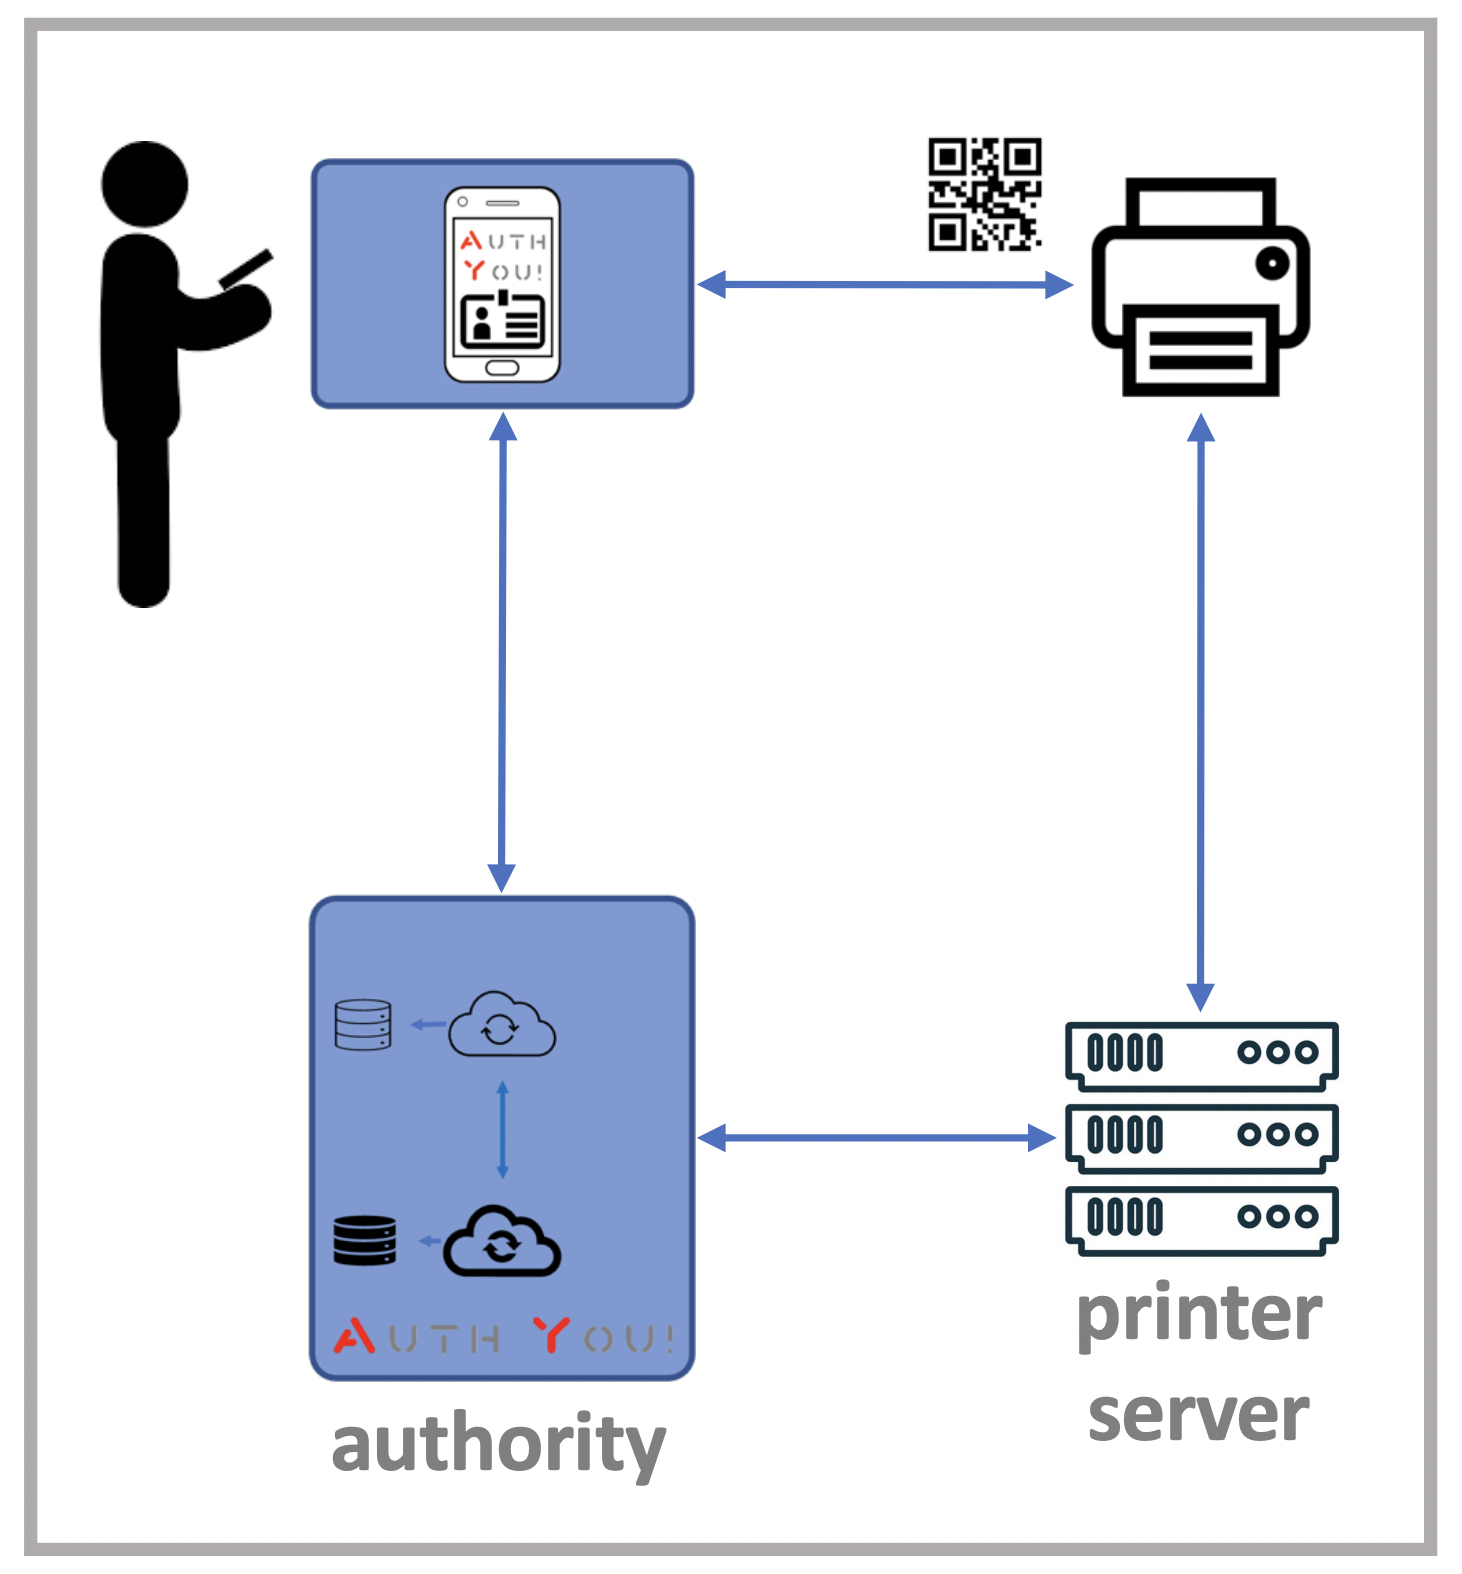
The authYou! app is used to login to a web site which is offering a oneTimePassword in a QR shape.
Please find below two sections describing the user interactions, to SETUP and to LOGIN:
1) USER SETUP: describes the process a user has to follow to activate the app
2) USER LOGIN: the login process, involving the web host AND the app
There is a section dedicated to the setup of the web host, to properly offer login facility and to manage response
3) HOST SETUP: how to setup the web host which is offering the login functionality
[In the following of this document, identityAuthority is this web site.
To contact the author, please write an email to info@authyou.systems]
**********************************************************************************
1) USER SETUP
**********************************************************************************
**********************************************************************************
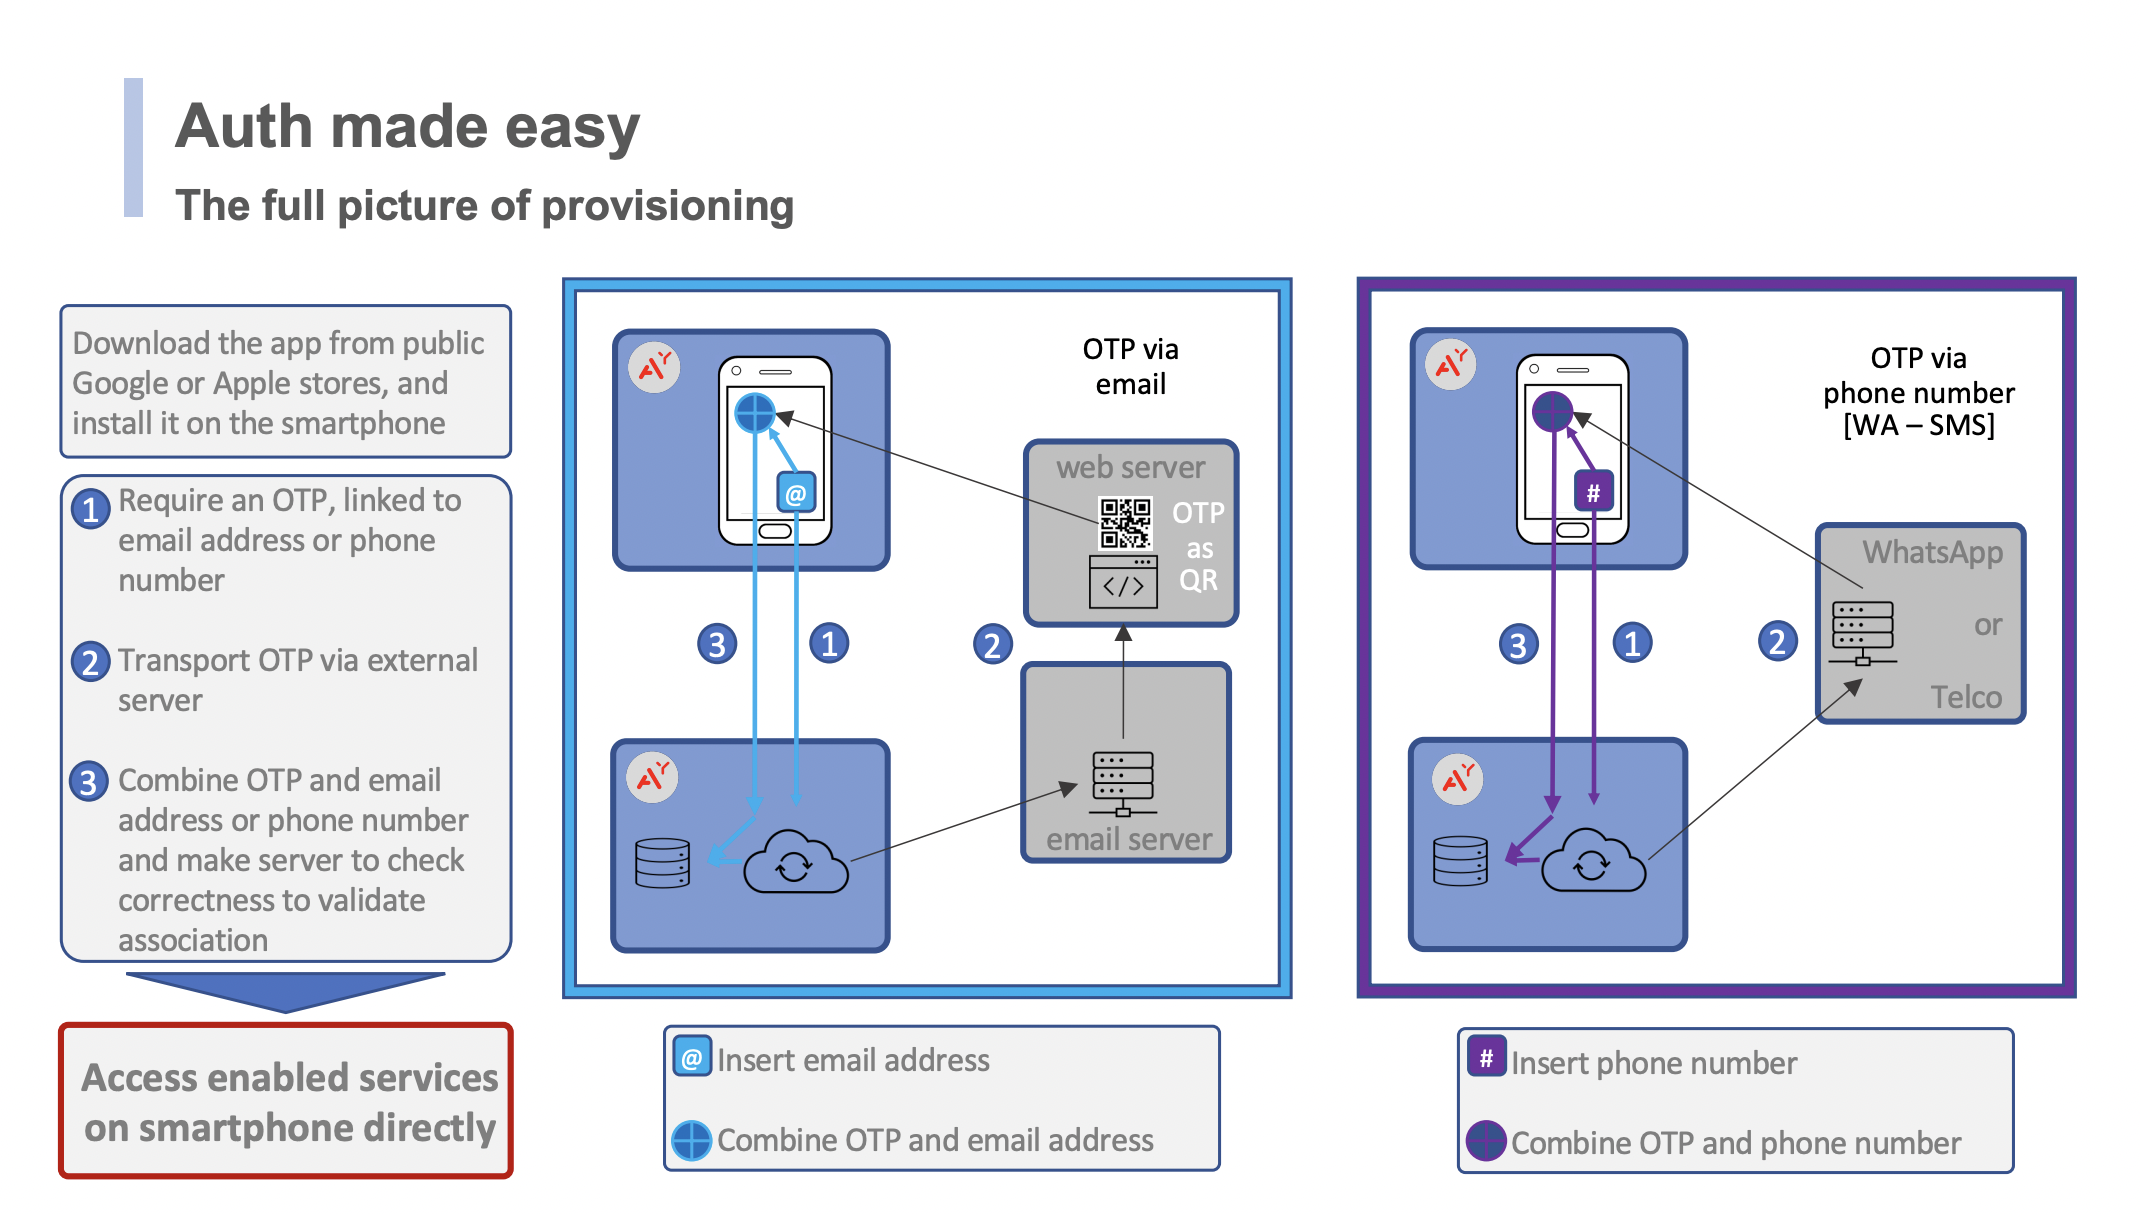
To setup the app, the user needs to own an email address, and to use also another device where a browser is installed
When the user inserts the email address in the "settings" tab of the app and presses the button "send OTL" [1],
the backend system generates a unique link, sends [2] it via email to the address specified by the user.
When, on the second device, the user receives the email message and clicks on the link [3],
a web page is opened in the browser, on the identityAuthority site
This web page display a new token [4] in a QR format, and the the user, with the app on smartphone,
presses the "scan QR" button and acquires the QR code [5].
This action ends the registration process, the app stores the email address.
The user has indeed demonstrated to have been able to access to the email address
<optional>
The identityAuthority site, where the QR code was displayed to complete the user setup,
also offers the facility to test that the configuration ended properly
Indeed a new page is shown when the user setup process ends, and this includes a new oneTimeToken.
By the "web" tab of the app, the user can now scan that code;
the app will tell to the backend server that this user has acquired that specific token.
The backend server will update the web page, showing the user own private data.
In this test facility the server will retrieve and show the email address which is bond to the acquired token.
</optional>
**********************************************************************************
2) USER LOGIN
**********************************************************************************
**********************************************************************************
The web site which has been configured to host the login facility, retrieves a token from identityAuthority.
The user, on the web tab of the app acquires the token by pressing the "web login" button.
The app communicates with the identityAuthority, and login is performed, redirecting the user to the landing page
**********************************************************************************
3) HOST SETUP
**********************************************************************************
**********************************************************************************
A web site which wants to offer this login facility, neeeds to insert in the login page the following code
=====================================================================================
<!DOCTYPE html>
<html>
<head>
<script src="https://<yourSite>/js/prototype.js"></script>
<script src="https://<yourSite>/js/jquery.min.js"></script>
<script src="https://<yourSite>/js/qrOtp.js"></script>
</head>
<body id="myBody" bgcolor="#FFFFFF">
<table align="center"> <tr> <td width="200" align="center"> <div id="myQRimage"> </div> </td> </tr> </table>
<script>
$(document).ready(function () {
var qrOtp = new QrOtp("myQRimage");
qrOtp.start();
});
</script>
</body>
</html>
=====================================================================================
The web site needs to host on "https://<yourSite>/js/qrOtp.js" the code obtained from identityAuthority at /js/qrOtp.js.
In this file, the following line has to be personalized accordingly with site needs.
=====================================================================================
var nextHop = "https://<yourSite>/<landing page>";
=====================================================================================
The landing page, where the authenticated user is redirected after a successful login, receives some parameters
In details, the requesterId and the token itself
The validity of the parameters have to be tested by the landing page against the API of the identityAuthority
In a PHP approach, this can be performed by the server, with an AJAX query.
If the result is negative, the token is not valid and the page has not to be displayed.
Here below the code sample to be inserted in the landing page and hosted in the host site.
=====================================================================================
landing page
<?php require('....../SecuredHeader.php') ?>
-------------------------------------------------------------------------------------
SecuredHeader.php
$apiUrl = 'https://www.authyou.systems/bin/otp.php";
$requesterId = $_COOKIE["requesterId"];
$token = $_COOKIE["token"];
if (isset($_COOKIE["authority"])) { $apiUrl = $_COOKIE["authority"]; }
$encodedFields =
'functionName=IsTokenValid'.
'&token='.$token.
'&requesterId='.$requesterId;
$ch = curl_init();
// set TIMEOUT
curl_setopt($ch, CURLOPT_TIMEOUT, 5);
curl_setopt($ch, CURLOPT_URL,$apiUrl);
curl_setopt($ch, CURLOPT_RETURNTRANSFER,true);
curl_setopt($ch, CURLOPT_FOLLOWLOCATION, true);
curl_setopt($ch, CURLOPT_SSL_VERIFYPEER, false);
curl_setopt($ch, CURLOPT_HEADER, false);
curl_setopt($ch, CURLOPT_NOBODY, false);
curl_setopt($ch, CURLOPT_POSTFIELDS, $encodedFields);
curl_setopt($ch, CURLOPT_POST, true);
$payload = curl_exec($ch);
if(curl_errno($ch)){ echo ("CURL POST TIMEOUT for ".$apiUrl.PHP_EOL); }
curl_close($ch);
$results = json_decode($payload);
if($results[0]==1){ $username=$results[1]; }
else { header("Location: /"); };
=====================================================================================
The requesterId parameter, on operation environment, has not to be sent with the token.
By intercepting both parameters, it's possible to query the backend system and to get back the user associated with the token itself.
Indeed, the requesterId parameter is the free equivalent - temporary apiKey which is used in server to server interactions.
It's done here to make it easier to explain and to configure an example.
Please contact the author for any additional info.
Are you curios about this strange symbol named tokenback?
Click on it to learn more!
**********************************************************************************
*** DISCLAIMER ***
The free version of the app includes a parameter in the communication with server which could lower the overall security.
This is intended to facilitate comprehension, the parameter is NOT needed and it is NOT included in the PRO version.
**********************************************************************************